| I found there were cracks
inside the drainage tube from the hatch where the tube joins the hatch
frame. You cannot see them, but jamming my finger inside I could feel them
around the lip of the tube. This leaves potential for water to leak into
the foredeck and be trapped there with no exit route. As we all know it
only takes one crack ....
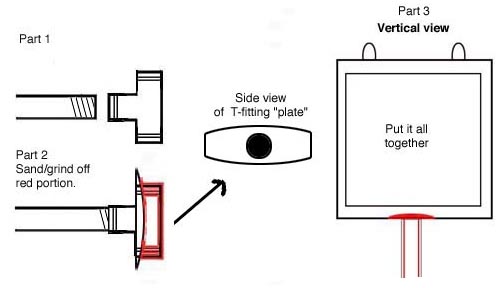
1) I purchased enough grey (PVC?) pipe to line the drainage to the anchor well. I used the grey because you can screw the fittings together with silicone tape instead of gluing them. This way you can remove the pipe if you want to. Also I don't know if you can get regular PVC in this smaller diameter. 2) As in the diagram, I ground off a portion of the "T" fitting to make a sort of face plate to epoxy the new drain tube in place, making sure that the "plate" covered the opening all round. 3) I cleaned and roughened the opening where I was going to insert the tube. I inserted the tube/pipe from the anchor well end, screwing it into the t-plate I'd fabricated. This pipe is slightly flexible, allowing you to bend it in. I epoxied this in place. When all was dry and cured I finished the area off with a new coat of gelcoat. * When you do this job, make sure you have clearance to close the hatch before epoxying it in place.
|